Showing posts with label sewing. Show all posts
Thursday, October 13, 2011

KCWC Day 2 and 3 results-men's dress shirt to girl's dress

The before shot (well, after removing collar before shot)

I have as yet to get Zgirl in this, so forgive the not great pics. I used the tutorial at Girl. Inspired.
I lost the pocket that was on the shirt, which I was planning to put back on in a different spot, so now I'm not sure what to do. The dress needs something more, so I'm trying to think of a fun applique or ribbon or something I can add to it. Ideas welcome!
Monday, October 3, 2011

Horsie


Since Harry and Horsie has been such a hit in our household (so much so that Zboy is getting that and Cookiebot for his birthday), I decided to have those be the inspiration for our Halloween costumes as well. I was trying to work with what I had on hand, rather than run out and buy a lot of fabric, so these are, as I said, inspired by the book (ie I am just calling them Harry and Horsie and they probably won't look anything like it!)
I used the woodland animal costume from Running with scissors. Remember Zboy's wolf? This pattern is so customizable and easy to follow. I did an even better job with it this time (especially the zipper!) Horsie is so far missing her ears, but I had a few mishaps trying to use some pink broadcloth cotton for the inner ear, and am waiting until I can get some felt to sew those suckers on. Zgirl isn't a fan of the hood-I think it's a bit heavy with all the yarn.
Cute, though, anyway. And warm, which is important, as it's starting to get chilly out there. Next up is turning Zboy into Horsie, and their red wagon into a rocket (I've enlisted DaddyG's help for that)


Wednesday, September 21, 2011

one of the handiest things about sewing...

is being able to tailor your clothes to fit! Specifically, Zboy's clothes, for the most part. He is a very chunky little boy, and pretty short. He needs 4T pants, but they are about 5" too long for him! So I either make his pants, or just fix ones we buy.
The biggest thing to remember is to leave extra so you can let it down later. I hemmed his pants last year, and left at least 1/2" extra (tucked into the hem) to let down for this year. It's perfect! (At least for the ones that still fit in the waist!)

This is something our grandparents and their parents (etc. etc.) used to do-make things last, and I think as a whole, we've really gotten away from that. It obviously won't work if your kid shoots up like a weed, but with the buttonhole elastic in pants now, you can always buy a size up, tighten them as much as they go, hem the bottoms-and you should have pants that will last a couple of years.

It's very easy, and even a beginner sewer is capable of doing this. You just need to measure carefully, cut straight, iron using a seam gauge, and sew a straight line.
Sunday, August 28, 2011

Two heads are better than one...finally finished and hung


A while back, I made the "two heads are better than one" wall hanging quilt from Whip up! Mini quilts. Having issues with my machine led it to sit gathering dust, until I got my new machine and quilted it. After finishing the art quilt for the swap, I realized binding wasn't that hard (ha!) and proceeded to finish this quilt. The binding did not go so well this time! First, I used my bias tape foot for 1/2" binding. That ended up being too small, so I made 3/4" binding by hand (just pressing it with my iron). It ended up being a bit wonky, but I stitched it on anyway. It ended up being way small on the front (I didn't adjust my seam allowance for the larger binding) and so then is huge on the back. Oh well, you don't see that! A solid color binding may have been a better choice as well.
I sewed on a sleeve, and my handy husband cut a dowel rod to fit and nailed it to the wall (the rod, not the quilt)
Another bummer, I realized the 2 different whites I used in the skull are actually 2 different shades. Good thing my son is only 2 and doesn't care =)

Currently, I'm working on compiling resources to start a very loose type of play based homeschooling with my 2 year old (soon to be 3). Pinterest is so amazing for this. I have found so many good resources.
Tuesday, August 23, 2011

First art quilt


I belong to a wonderful swap group, where we swap items for nature tables, made from natural materials (ie no acrylic felt or yarn, instead cotton or wool is used). Recently, they deviated and had a 1 on 1 swap (usually it's a group thing) for wall hangings. I was paired with a mama who does felted wool things, so I'm really excited to see what I get.
I've been working (for a lot longer than I expected, actually) on this quilt and it's finally done, with the exception of adding a hanging sleeve. I didn't know you were supposed to add them before the binding. Whoops!
It was my first attempt at free motion quilting, which is a lot, lot harder than I thought it would be. Since my skills were not so great, I used matching thread in the needle and bobbin, instead of using thread in the bobbin that matched the backing fabric. This way, mistakes on the front would be less noticeable. As it's intended to be a wall hanging, I think it's ok that all my stitches are obvious on the back.

I really hope she likes it-and if she doesn't, I'm asking her to return it to me, because I LOVE it.

What do you think? Too plain? Not sewn well enough? AMAZING? (Please pick the last! LOL)


Thursday, July 14, 2011

Bunting tutorial (with buttonholes!)


I wanted to make a bunting for Zgirl's birthday, so I scoured the internet for tutorials to get a basic idea. None were quite what I had in mind, but mine is mostly based on this one at Whip up (I <3 this blog). So here is MY take on a bunting =) (be warned, extremely pic heavy)

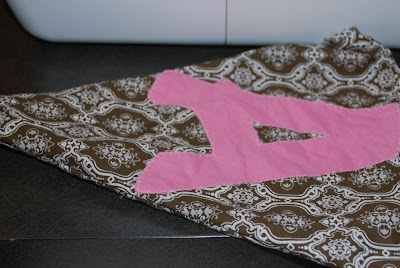
So start off by printing out whatever word you want. I used Marker Felt font at 400 pt. (It may have been better at 375, but 350 on the tutorial I saw seemed too small) Trace them (backward) onto some wonder under. Iron onto the back of your fabric. I used a variety of cottons, but I imagine you could use just about anything you can iron. Cut out your letters, carefully.


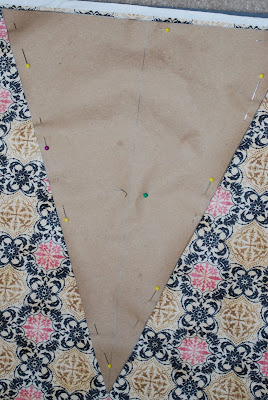
Cut out a template for your triangle. Mine was 10 1/4" at the widest, and 13 1/4" up the middle. I had my awesome engineering husband draw it, because he has a steady hand (also, I hate trying to draw straight lines) Cut out 2 of each fabric for each triangle, or go nuts and do separate prints for each side. Do this carefully! I hardly use pins, but I used a lot to make sure I was more precise.
Iron your letter on.

Use whatever stitch you like to applique it on. I used the applique or blanket stitch on my machine. A contrasting thread may look better than matching.


Turn the triangle pieces to face right sides together. Sew all around (I used a 1/4" seam allowance on the sides and 1/2" at the top.) Leave a small opening to turn your triangle. Before turning, trim the tip of the triangle. I didn't do such a hot job, so my points aren't great.


This is what it looks like before ironing.


Iron carefully. You can topstitch or not-I think it looks better topstitched. (left-not topstitched, right-topstitched) and you'll have to either do a slip stitch to close the opening you left to turn the triangle, or catch it in your topstitching.


Here's where I was stumped-I didn't want to sew them onto a strip of fabric or bias tape, and leaving an opening to thread something through seemed like a lot of work. DaddyG (like always!) had a brilliant idea-use buttonholes! So I made two buttonholes, equal distances from the sides (1 1/2" from the tip of the point and 1 1/4" down from the line of topstitching if you care) and perfection! Now, if I ever want, I can reuse the letters for another bunting.

A tip I never knew-put a pin at the top of the buttonhole, so you don't accidentally slice through your stitches.


And I'm done! I used a ribbon I had laying around, but I think a solid color would look best. Up next is a "Happy birthday bunting".


Thursday, June 23, 2011

Shirred skirt with pockets (for me!)


I've been concentrating on sewing so much for the kids that I haven't done much for myself or my husband lately. I just ordered some shirting fabric for him (there is a ton on sale at fabric.com for $1.95 a yard!) and so I wanted to whip up something for myself before that arrived and I was elbow deep in trying to make a man's shirt.


The tutorial is here at Running with Scissors
. It was easy to follow, and as I didn't notice a seam allowance listed, I asked and she replied she used 1/2". I made it from a quilting cotton I had-don't you just love the retro owls? I made each of my skirt pieces 34" wide, and looking back, I should have made them 32" each, because the skirt is just a little too full and has a bit of a pouf in the front under the shirring. It was pretty quick and easy, and I'd definitely like to make more (she has examples of others she made with bias tape and contrasting thread) with some changes. I'll make the pockets deeper, for one thing. I still need to hem it, but I'm trying to decide if I like it this length or not. I may make it more knee length. What do you think?


Sunday, June 19, 2011

I fear buttonholes no more! (or Zboy's new whale shorts)


Be warned, this post has a lot of pics. I wanted to explain what I was doing as I did it.

To go with the shirred whale print dress I made for Zgirl, I sewed up a pair of shorts with cargo pockets and matching T for Zboy.

I've never really done pockets before, and as you may have noticed, I had a huge hate for buttonholes. My old machine was a 4 step process, and it always looked terrible. With my new machine and it's 1 step automatic buttonhole, be prepared to see lots of buttons coming!

I again followed my altered version of the basic pants/shorts pattern found here. I sewed the crotch seam together, and then the outer leg seam. I figured this would be the easiest way to add pockets. Measure the size of pocket you want, then iron under the raw edges. I should have serged them first, but I didn't. Now is the time to add a button if you want to sew it on with your machine. Mark the spot for the pocket, making sure both sides match. Topstitch the sides and bottom (I used a contrasting thread to add interest).
Then you want to measure for your flap. You want it to extend a little beyond each side of the pocket. Sew the short sides and one long side, leaving the other open. Trim the corners. Turn, and use a crochet hook or something to push the corners out. Iron it carefully. It should look something like this.


Then, if you want, topstitch the flap, leaving the unsewn side still open.


If you want a buttonhole, now is a good time to add it! Lay it with the side you want on top against the right side of the fabric. Match it up with the pocket and sew a straight line across.


Iron it down carefully, folding it over where you have sewn. Then, topstitch. This isn't necessary, but it helps keep the fold in place.


Then, sew the inner leg seam together, and follow the rest of the tutorial for adding elastic. Cute cargo pockets (with buttonhole! and handsewn buttons, because I forgot that step) on a cute pair of shorts.


Friday, June 17, 2011

Fussy cut applique

How to do a fussy cut applique
(onto a knit fabric)
Cut out your piece, and apply some fusible webbing (like wonder under). I left a tiny bit of white around. You can do this, or just cut it out completely. Iron onto your fabric. I was aiming for a logo type look (like Le Tigre)

Tip #1-When appliqueing onto a knit fabric, put interfacing on the back of it! I forgot this all important step, and ended up with a satin stitch mess that took forever to rip out. You could also use tear away stabilizer, or a piece of tracing/tissue paper underneath. I ended up using some lightweight interfacing and tracing paper.


Tip #2-Practice on a scrap piece first so you can figure out where you want your stitches to lay. I got halfway through and realized, hey, this would look so much better here-so again, I had to rip out a bunch of stitches.

It's still not perfect, but this is a pretty small piece to work with. I added the spout detail with the triple stitch on my machine. It didn't work as well as I hoped on the stretchy knit, but you don't notice unless it's close up like this picture!
Thursday, June 16, 2011

sewing machine tip

Help keep your machine out of the shop! I read this recently on Prudent Baby (her post is here)

When switching threads, instead of just pulling the spool up and the thread out of your machine, cut the thread at the top, raise your presser foot, and gently pull the cut thread out through the bottom. I don't know if you're like me, but I'd always just yank it out attached to the spool. I'm hoping this helps my new machine stay nice and out of the shop for longer!
Sunday, June 12, 2011

Shirred whale print dress


I found a tutorial at "A Lemon Squeezy Home" for an adorable shirred dress. I love the effect of shirring, but it was such a challenge with my old machine that I had given up. Luckily, it is super easy with my new machine (even though it has a drop in bobbin-check here for tips on dealing with that) I wound my bobbin both by hand and by machine, and didn't notice a difference in either. My problem was getting the bobbin thread up out of the casing.

It is a super easy tutorial to follow. She even includes a great link on shirring, in case you're nervous about trying. (don't be!)

All told, this didn't take me long-a few hours (but with kids, that is probably 1 hour kid-free time) I love the idea of adding details to the dress, especially if you have a simple solid color. The hardest part was measuring Zgirl. She kept wanting to play with the measuring tape =)


Saturday, June 11, 2011

Piratey goodness


Zboy's friend turned 3 this week, and we were invited to his birthday party! As you all know, I have an unabashed love of all things piratical. I made a set for Zboy as testers, and as they're mostly the same size, I'm hoping it will fit the birthday boy well!
I made the shorts using the tutorial here (I just adore this blog) and the first pair was way too small. I ended up adding 3" total around to the pattern. I added my favorite cut-out applique, and piratey goodness ensued.

The fabric is an odd shade, so I decided to make matching initial appliqued shirts as well. Done on my new machine with the applique/blanket stitch-so super fast and easy!


Friday, June 10, 2011

Taking a deep breath here...


I want to show you the mess that I am working within. Yes, I am a packrat, and a slob. I try not to be, but I just get overwhelmed. This is the only room the children aren't allowed in, so that means a lot of stuff just gets tossed in here. I had to try and get a little organized because I was waiting for my new sewing machine!
What tips do you have for organizing on a budget? (Of course, we'd all like rooms like the above, but realistically, it's not going to happen!)
Here are the hideous before pictures:


And here is the halfway done/my machine came and I just want to try it out so I quit for now. I have a few boxes of things that need to get put downstairs that are kids' things for an upcoming consignment sale. That will free up some room. I had intentions of painting the room cotton candy pink, but that obviously hasn't been done yet, and as our lease is close to up, will wait.


And here is my new machine! I started off sewing test stitches of all available, and there are some awesome ones. The one I am most excited about is the applique/blanket stitch. I have already done some of the small pieces on the monster quilt and was really pleased with the results. I did a test quilt square with the walking foot, and was amazed at the difference.


Mostly, I have been working on what's in this package. Shh-it's for a birthday party tomorrow! I'll post pics of what it is after the birthday boy has gotten his present. Not as exciting as toys, but fun for the parents, right?
Sunday, June 5, 2011

Oliver + S Jump Rope Dress


I recently finished the jump rope dress (view A) (pattern by Oliver +S) This is an adorable pattern, and as well laid out and written as the seashore dress.

The main issue I have with this is that it is SO HARD to get on! Reading the Oliver + S forums, I found this is a common problem, even with older children. I left off the belt and pockets, as I didn't see any need for them on a dress for a baby. I was afraid it would throw off the fit, but I think it worked out fine. The placket (can I just say I never even knew what a placket was before this?) was the most fidgety part, followed by the sleeve tabs. With careful attention to the instructions, however, (no googling necessary!) I was able to complete these fairly easily.

I made this with butterfly snaps (like I did on the seashore dress), because I obviously had to!


Blog Template by YummyLolly.com