Showing posts with label zgirl. Show all posts
Thursday, October 13, 2011

KCWC Day 2 and 3 results-men's dress shirt to girl's dress

The before shot (well, after removing collar before shot)

I have as yet to get Zgirl in this, so forgive the not great pics. I used the tutorial at Girl. Inspired.
I lost the pocket that was on the shirt, which I was planning to put back on in a different spot, so now I'm not sure what to do. The dress needs something more, so I'm trying to think of a fun applique or ribbon or something I can add to it. Ideas welcome!
Tuesday, October 11, 2011

KCWC Day 1 results-adult T to baby dress


I procrastinated a lot, played on Pinterest way too much, but finally was inspired to make this quickie adult T to baby dress.

I traced a shirt of Zgirl's to get the basic shape, and then cut apart my adult T. I decided to save the sleeves and just cut them a bit smaller. I cut my pieces out, and left them the length of the shirt (because I really liked the original hem) Somehow, things got wonky and the front was way shorter than the back, so I just trimmed off the back. This was a short sleeve shirt-I just cut out pieces of a knit (don't you love that print?) and attached them under the hem of the short sleeve to make it long sleeve.

It's not perfect by any means, but I was pretty impressed that I went from idea to finished product in about an hour. Having a serger helps.


Monday, October 3, 2011

Horsie


Since Harry and Horsie has been such a hit in our household (so much so that Zboy is getting that and Cookiebot for his birthday), I decided to have those be the inspiration for our Halloween costumes as well. I was trying to work with what I had on hand, rather than run out and buy a lot of fabric, so these are, as I said, inspired by the book (ie I am just calling them Harry and Horsie and they probably won't look anything like it!)
I used the woodland animal costume from Running with scissors. Remember Zboy's wolf? This pattern is so customizable and easy to follow. I did an even better job with it this time (especially the zipper!) Horsie is so far missing her ears, but I had a few mishaps trying to use some pink broadcloth cotton for the inner ear, and am waiting until I can get some felt to sew those suckers on. Zgirl isn't a fan of the hood-I think it's a bit heavy with all the yarn.
Cute, though, anyway. And warm, which is important, as it's starting to get chilly out there. Next up is turning Zboy into Horsie, and their red wagon into a rocket (I've enlisted DaddyG's help for that)


Wednesday, August 10, 2011

Fiesta!


completely inspired by Prudent Baby's fiesta

We were working with a tight budget, and made most of the things for Zgirl's first birthday fiesta.

For food, we had all the ingredients to make your own burrito, bean dip, Spanish yellow rice, fruit salsa with cinnamon sugar tortilla chips, and guacamole. The cake was tres leches with a dulce de leche "frosting".
I made some quickie papel picados from construction paper.
Coffee filter flowers-we used the leftover dye from the cascarones to dye most of these. There are a lot of tutorials online, but we just kind of winged it. Dyed the filters, folded them into quarters and cut random shapes from the edges, and twisted them around pipe cleaners.
Birthday and name bunting, along with a pic from each month.
My mom made a quickie papel picado banner from sheets of tissue paper.
After cascarones. I didn't get any pics of them before we busted them, but they're just dyed eggs filled with confetti, and the hole is sealed with matching tissue paper. We made our own confetti using magazine pages, and the pieces we cut from the dyed coffee filters.

An after shot of the cascarone insides.

She didn't care for the cake, but she loved the ice cream!
Zboy loved the cake and ice cream.


I didn't get any great pics of Zgirl in her party dress, but it was based off this mini boden dress tutorial. The sugar skull fabric was perfect for the theme. I sized it down, added a few more rows of shirring than the tutorial asked for and some hot pink rick rack. Not my best work, but it was very fast.

We played pin the tail on the donkey, which went surprisingly well, considering it was mostly 2 and 3 year olds. Zgirl got some Gymboree bubbles (have you tried these? SO worth the $$, I found them hours later!) and everyone had fun with that.

Thursday, July 14, 2011

Bunting tutorial (with buttonholes!)


I wanted to make a bunting for Zgirl's birthday, so I scoured the internet for tutorials to get a basic idea. None were quite what I had in mind, but mine is mostly based on this one at Whip up (I <3 this blog). So here is MY take on a bunting =) (be warned, extremely pic heavy)

So start off by printing out whatever word you want. I used Marker Felt font at 400 pt. (It may have been better at 375, but 350 on the tutorial I saw seemed too small) Trace them (backward) onto some wonder under. Iron onto the back of your fabric. I used a variety of cottons, but I imagine you could use just about anything you can iron. Cut out your letters, carefully.


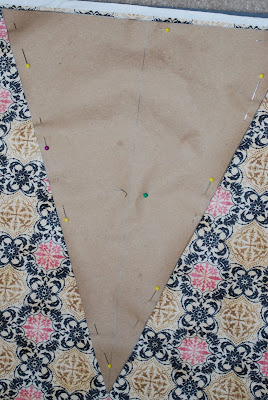
Cut out a template for your triangle. Mine was 10 1/4" at the widest, and 13 1/4" up the middle. I had my awesome engineering husband draw it, because he has a steady hand (also, I hate trying to draw straight lines) Cut out 2 of each fabric for each triangle, or go nuts and do separate prints for each side. Do this carefully! I hardly use pins, but I used a lot to make sure I was more precise.
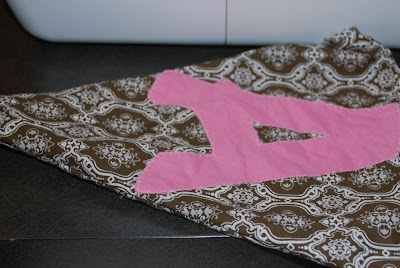
Iron your letter on.

Use whatever stitch you like to applique it on. I used the applique or blanket stitch on my machine. A contrasting thread may look better than matching.


Turn the triangle pieces to face right sides together. Sew all around (I used a 1/4" seam allowance on the sides and 1/2" at the top.) Leave a small opening to turn your triangle. Before turning, trim the tip of the triangle. I didn't do such a hot job, so my points aren't great.


This is what it looks like before ironing.

Iron carefully. You can topstitch or not-I think it looks better topstitched. (left-not topstitched, right-topstitched) and you'll have to either do a slip stitch to close the opening you left to turn the triangle, or catch it in your topstitching.


Here's where I was stumped-I didn't want to sew them onto a strip of fabric or bias tape, and leaving an opening to thread something through seemed like a lot of work. DaddyG (like always!) had a brilliant idea-use buttonholes! So I made two buttonholes, equal distances from the sides (1 1/2" from the tip of the point and 1 1/4" down from the line of topstitching if you care) and perfection! Now, if I ever want, I can reuse the letters for another bunting.

A tip I never knew-put a pin at the top of the buttonhole, so you don't accidentally slice through your stitches.


And I'm done! I used a ribbon I had laying around, but I think a solid color would look best. Up next is a "Happy birthday bunting".


Sunday, June 12, 2011

Shirred whale print dress


I found a tutorial at "A Lemon Squeezy Home" for an adorable shirred dress. I love the effect of shirring, but it was such a challenge with my old machine that I had given up. Luckily, it is super easy with my new machine (even though it has a drop in bobbin-check here for tips on dealing with that) I wound my bobbin both by hand and by machine, and didn't notice a difference in either. My problem was getting the bobbin thread up out of the casing.

It is a super easy tutorial to follow. She even includes a great link on shirring, in case you're nervous about trying. (don't be!)

All told, this didn't take me long-a few hours (but with kids, that is probably 1 hour kid-free time) I love the idea of adding details to the dress, especially if you have a simple solid color. The hardest part was measuring Zgirl. She kept wanting to play with the measuring tape =)


Sunday, June 5, 2011

Oliver + S Jump Rope Dress


I recently finished the jump rope dress (view A) (pattern by Oliver +S) This is an adorable pattern, and as well laid out and written as the seashore dress.

The main issue I have with this is that it is SO HARD to get on! Reading the Oliver + S forums, I found this is a common problem, even with older children. I left off the belt and pockets, as I didn't see any need for them on a dress for a baby. I was afraid it would throw off the fit, but I think it worked out fine. The placket (can I just say I never even knew what a placket was before this?) was the most fidgety part, followed by the sleeve tabs. With careful attention to the instructions, however, (no googling necessary!) I was able to complete these fairly easily.

I made this with butterfly snaps (like I did on the seashore dress), because I obviously had to!


Tuesday, May 17, 2011

Finished the back


If you remember my post the other day, I'm slowly knitting up a little tanktop for Zgirl. I've finally finished the back. It would have been done sooner, had I realized the pattern was in cm, not inches. So it's a bit longer than it's supposed to be, but thankfully I realized before I made it 22"! It's a wonderful soft variegated wool yarn (Malabrigo silky merino). Not too shabby for a slow, left handed knitter, eh? I'm documenting it on Ravelry, with my other crochet/knit projects, so add dahlea as a friend if you'd like!
Friday, May 13, 2011

Oliver+S Seashore dress


Finally finished! It took a bit longer than expected, due to grocery trips, fussy babies, and the normal things. This was a very easy pattern to sew, and the directions are very straightforward, much more so than the usual commercial pattern (like Butterick, etc.) Next time, I'll probably make the bigger size (this is the 12-18 month size and it's almost tight. Zgirl weighs around 20 lbs) and I'll leave the pockets out until she's older. There are bloomers that you can make for underneath, but I'll save those until after I finish Zboy's pj set.

This is the first thing I finished for "Kids' clothing week challenge".

Back view


Snap detail-see the butterfly?
Tuesday, May 3, 2011

on my needles


I'm not much of a knitter, being left handed and unable to knit any other way. I can do simple things, so I'm trying out this cute little tanktop. (Pic is taken from the site I got the pattern from) I'm knitting it with Malabrigo silky merino yarn in a yummy pink (previously bought for Bloom, which I was unable to do!)
I finished a crochet skirty for Zgirl as a diaper cover/skirt, and will take pics of it once little miss isn't sick and is more willing to have her pic taken. Everyone in the house has been sick for the last week (excluding me-knock on wood!) so everything is going a bit more slowly.
Thursday, April 21, 2011

Bloom


I'm not much of a knitter. I try, but being left handed makes it quite difficult. (Don't believe anyone who tells you that it doesn't matter because you knit with 2 hands! It DOES make a difference.) Anyway, I tried to knit this pattern-Bloom, but after 2 weeks, I frogged it. A friend of my mom's was gracious enough to knit it for Zgirl, and WOW. It is so beautiful. It is sized to grow with your child, turning from a dress into a shirt. That really makes it worth knitting. And check out Zgirl's awesome new Very Hungry Caterpillar Eric Carle Robeez!
Monday, April 4, 2011

Hedgehog bloomers


I love the Heather Ross book Weekend Sewing. It's full of quick, easy things to make. These bloomers were a snap to make, and quick to boot. They're Michael Miller hedgehog material. It only took 1/2 yard! I didn't have the 3/4" elastic called for in the waistband, but I used 3/8" elastic, and it seems to work fine. I also cut out 4 separate pieces, instead of having the front and back be the only two pieces.


Blog Template by YummyLolly.com