Like my new header? Emma Catarino, of Emma Catarino Designs, had a giveaway for a free logo, and made me this beautiful banner instead! I recommend checking out her site if you have need of any graphic design for your business, blog, or whatever. She's very talented, as you can tell!
Coming soon...a new blog design by She Thinks Media. Another mom I know, who loves working with small businesses and people to make your site stand out.
Sunday, February 27, 2011
Sparkly shirt from Prudent Baby tutorial

I made the lovely Zgirl a "Prudent baby party dress", although it ended up being more of a long shirt, due to a wiggly girl who won't hold still so Mama can measure her! The tutorial can be found here at the awesome blog that is Prudent Mama (if you've never seen it before, take your time and poke around-there are lots of great articles, tutorials, etc.)
I love the pattern and how it is pretty customizable-sleeve length, cuff or no cuff, hem or self fabric binding at the bottom, length of skirt, etc. The main issue I have is with how dang hard it is to get on! Having just one button (actually, I used a snap) doesn't allow enough room. This was kind of a tester anyway, to see how well it fit. She says it's a 9-12 month pattern and it fits Zgirl pretty well, with not a lot of room to grow (she's 19 or 20 lbs, fyi) I'm going to add 1/2" around the pattern when I make it again so that she can wear it for a while. I also plan to either have the back completely split and snap shut, or do it halfway, instead of just at the top like the tutorial says.
Her tutorial calls for a "scant" seam allowance, and I wasn't sure how much that was so I opted for 3/8". I didn't have any coordinating fabrics so I made it all of one type, with no cuffs. It took around 2 hours, I think. I'm in and out, tending to kids and husband, so it's hard to tell sometimes. All in all, I think it's adorable, and I plan to make more!


Labels:
baby,
party dress,
pics,
prudent baby,
tutorial,
zgirl

Friday, February 25, 2011
Month 3 applique for monster quilt

I have finished the month 1 monster (except for the small bits-I'm waiting for my mom to come and help me with those) and just finished the month 3 monster. I don't have a fancy machine (in fact, it's one of the cheapest, most basic ones. I'll have a great one someday!) and so I don't have the blanket or applique stitch. After asking around a few places, it was down to using the blind hem stitch or a simple zigzag. I did a lot of experimenting, and chose the blind hem as it's most similar to the blanket stitch (instead of a zig or "arrow" going in, it's a straight, closed stitch) My settings are just over 1 for stitch length and a little over 3 on the size of zigzag.
The biggest tip is to go slowly, and turn it by hand around the tight spots. I'm not perfect, but I am slowly improving on each piece I applique. Here's a close up of the heart so you can see what my stitch looks like.

As I work on each monster, I keep a ziploc bag handy, and keep all the little bits, fabric, pattern, etc. inside so I don't lose anything or get it confused. Simple idea, I'm sure, but one I'm happy to have thought of, as I tend to lose things and am very disorganized.

Labels:
applique,
block a month,
monster,
month 3,
quilt
Sunday, February 20, 2011
Super Zs!
Families, Create! A Monthly Make and Play Carnival
It's that time again! The theme this month is heroes and heroines. My idea may be a bit cliche when it comes to it, but I think they're still cute!
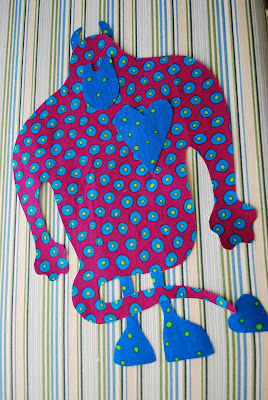
I made my own pattern for an applique, putting a Z in the middle of the Superman shape. It took a while to get the size down, and a straight ruler and pencil are an absolute must.
I then traced the pattern (backward) onto Wonder Under and attached to the fabrics I was using. I originally planned to make the applique three pieces-the background, the shape outline, and the letter. However, I don't have a lot of solid fabrics or pieces that go together, so I decided to just cut out the open spaces of the applique. Here's one to show what it looked like.

I then ironed on the appliques.

I sewed them using the blind stitch on my machine-I don't have a fancy machine with an applique stitch, sadly. This was a bit tricky and required some practice. It's not easy to rip stitches out of an applique-it frays the fabric and messes up the wonder under, so practice on a scrap first!


I'm going to try to get pictures of Zboy and Zgirl in their super-shirts soon.
 February brought many heroic crafts to the Families, Create! Carnival. Check out some of the wonderful posts from last month's participants below, and be sure to visit Code Name: Mama and Living Peacefully with Children to find out how you can participate in the next Families, Create! Carnival.
- The Artsy Mama made a personalized birthday hat for her son's first birthday. Learn how to make a Hero's Birthday Hat for your hero or heroine with very few sewing skills.
- Mandy at Living Peacefully with Children found inspiration in books for some I-Spy items in her post, I Spy Items - The Last Olympians and The Lost Heroes.
- Megan at Purple Dancing Dahlias found out how one random act of kindness can shower the world in kindness in the book Ordinary Mary's Extraordinary Deed.
- It's a bird, it's a plane, it's Super Kieran! Dionna at Code Name: Mama shares the Superhero Capes she made to celebrate her son's heroic qualities.
- At Z Everyday Things, Mama G made easy and quick Super Zs!, personalized superhero appliques on shirts, for her children. Easy and quick!
- Lauren at Hobo Mama has a son who loves to dream up stories and one heroic imaginary friend. Read her post about Space-Alien Hot-Dog Monster & Silly Guy .
- Heroes are often everyday people. Mandy at Living Peacefully with Children was inspired by the gift of a sock in Harry Potter and the Chamber of Secrets, prompting her to make Dobby's Sock as part of her Harry Potter ornaments.
- Galit Breen at Three Little Waves used the book Sadako and the Thousand Paper Cranes as a springboard for a sensitive discussion and a fun origami project for her whole family in her post Families Create: Heroes and Heroines.
- Need a creative gift idea for a toddler or preschooler? Dionna at Code Name: Mama shares a simple Tutorial for a Two-Sided Felt Playmat (one side is outer space, one side is a jungle scene).
- Literature and adventure inspired Mandy @ Living Peacefully with Children to make these Treasure Bags for Imbolc.
Visit Code Name: Mama and Living Peacefully with Children to find out how you can participate in the next Families, Create! Carnival. Our March theme is "Animals" - what animals are your favorites and why? Get creative and share with us how animals are a part of your and your children's lives.
Thursday, February 10, 2011
Clown toss


I got a book from the library that is part of a series-it's called "Year of Fun-Just for Twos" (there is a book for each age group). They have seasonally appropriate activities by month. It's a fantastic resource, with ideas I haven't seen or heard of before. One for February was making a clown toss game.
All you need is a cardboard box, some markers or crayons, and something to cut a mouth with (I used a utility knife). Zboy loved helping color the box, and while my art skills leave something to be desired, it was a quick, dirty job. We have a couple of beanbags I had made a while ago, and I looked around for anything else soft and small to throw. Next time, I'll put the mouth up higher and make it bigger-it was a bit too small for Zboy to get anything in easily, which is frustrating for him. I'll make some smaller beanbags too as mine are a bit too large. It was a fun game, and lasted double the time activities usually do, since we had to color it and then play with it.
Labels:
activities,
beanbags,
cardboard,
clown toss,
crafts,
zboy
Monday, February 7, 2011
Imagine Childhood giveaway
If you've never visited the Imagine Childhood store, you need to! They have such amazing, imaginative toys for children, and they're having a giveaway! Just leave a comment here at their page to enter!
Labels:
giveaway
Sunday, February 6, 2011
Prepping applique pieces for a quilt
I'm going to document some of the steps in making up quilt blocks. I've never done it before, and my mom is coaching me over the phone and via webcam.
Once you have your fabric, pattern, and thread, you'll want to get this awesome stuff called "Wonder under". It's fusible on both sides and has a paper backing.
Trace your pattern (using a sunny window or a lightbox) onto the paper backing of the Wonder under. Here's the key-you have to turn your pattern so the back of the paper is facing you. You want to end up with your pattern looking exactly like it does, not a mirror image. I messed this up on the first monster, but in this case, it doesn't matter-he is just flipped the other way. In other quilts, this can be a big mistake! So flip your pattern over, lay the wonder under on top and trace onto the paper backing.
Now cut out your pieces, but don't bother cutting along the lines-once you add it to your fabric, you'll be cutting again, so just make rough cuts. Another big reminder-iron your wonder under pattern piece onto the wrong side of your fabric. Yep, I made that mistake too, and ironed it to the front.
Don't do this!
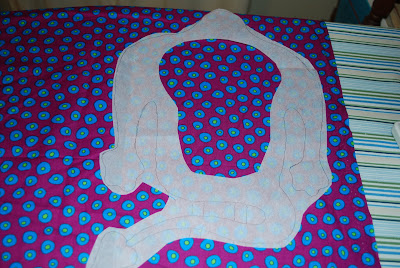
Once you have done this, your fabric piece will be unusable and you'll have to retrace the pattern piece onto a new piece of wonder under.
Do this!
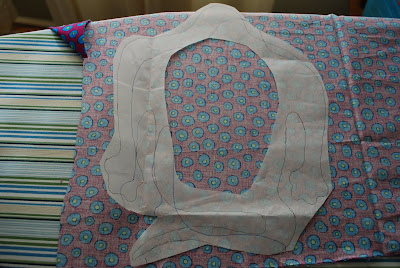
So, iron your pattern pieces onto the wrong side of the fabric. Lift and place your iron-don't drag it! Leave it on each section for around 8 seconds. Cut out your pieces along the lines, and there you go! You have your applique pieces ready to go.
Mine aren't completely ready because I need some white for eyes and red for mouths, but you get the idea.
Month 1 Monster

Month 3 Monster

Friday, February 4, 2011
Giveaway at the Cloth Diaper Geek

Win a free medium wahmie's wetbag! A friend of mine owns that site and She Thinks Media. She's an amazing businesswoman, and can help you get your own business or page started. Check it out and let her know I sent you!
Thursday, February 3, 2011
Free kids' gardening kit!
Sign up for yours at Annie's
You just need 2 upc codes from Annie's products and you get a free kids' gardening kit.
You just need 2 upc codes from Annie's products and you get a free kids' gardening kit.
Labels:
freebie
Subscribe to:
Posts (Atom)


